Wednesday, April 25, 2012

You Are Not A Beautiful & Unique Snowflake

Ah, Fight Club.  Can anyone make soap without thinking of it?  Not I...


After months and months and MONTHS of procrastination, I finally got around to making a new batch of soap this past Monday.  Soap-making (like cheese-making) is the epitome of "hurry up and wait."  It's tedious, dangerous, finicky, and time-consuming.  Do you wonder why I procrastinated for so long?  That, and it's soooo much easier to make soap when the weather is warm (that way the soap doesn't "catch cold" while it's reacting).  So, since we have had a stretch of UNPRECEDENTEDLY warm 80- & 90-degree days this April (this, by the way, makes me terrified for what summer is going to be like!!), I decided it was now time to make soap.  In the words of Tyler Durden, to make soap, we must first render fat.  Not having any liposuction clinics at my disposal, I instead use grass-fed, naturally raised beef suet.  Now, a quick word on suet: many times (with inexperienced butchers, especially) you will go in and ask for beef SUET, and instead the butcher will give you beef FAT.  This is not correct.  While suet is technically fat, it is a special kind of fat found around the kidney area of the cow.  Suet (once it is rendered into tallow) provides the nicest, firmest soap.  Beef fat will give you a poorer quality, softer soap.  So, now you know to be specific!  Also, always ask them to grind the suet, as it will make rendering it go more quickly (and you will get more tallow).

Anywho, on Sunday morning, I filled my giant stockpot (I have two special stock pots for soap-making.  One is specifically for rendering fat, the other for making soap.  I NEVER use them for anything else!) with ground suet, then poured enough water into the pot to cover the suet.  Then, I added a cup or two of salt.  I set it on low heat, and stirred every few minutes.  From past experience, I can tell you that it is NEVER a good idea to leave a batch of fat unattended!  Cleaning up the kitchen after a pot of fat has boiled over is nooo fun!  Anywho, you want to render the fat slowly at low heat.  This might take anywhere from 30 minutes to an hour, but get used to it - making soap is a very time-consuming (albeit worthwhile) process.  Once the fat has entirely melted down, and only the chunks of brown gristle are left, you pour the entire contents through a sieve into a large container.  The sieve catches the gristle bits, and allows only the melted fat through.  Put the container in the fridge to chill overnight.  The next morning, you will see a solid off-white layer of tallow on top, and brownish-liquid on the bottom.  


Over the sink, remove the tallow layer (it should pop out as one piece), and dispose of the brown liquid.  Using a butter knife, scrape off the gunky layer at the bottom of the tallow.  Then, you can either use the tallow to make soap that day, or, you can put it in a large ziplock baggie and store it in the freezer.

So, Day 2 is the actual soap-making extravaganza!

The first step of soap-making is to make sure that your working area (usually the kitchen) is spotlessly clean and organized. You'll want the sink clean and clear, just in case you need to do hot or cold water baths during coordinating temperatures of the lye and fat.  I usually start by measuring the fats first, then measuring the lye.  So, take your soap-making-only stock pot and set it on top of a kitchen scale.  Zero out the scale (with the pot on it), and then proceed to measure out your different fats and oils.  I HIGHLY recommend the book "Soap: Making It, Enjoying It" by Ann Bramson.  I have gone through a great deal of books on the subject over the years (many with poor or even inaccurate directions!), and this is the ONLY book I keep on hand and still refer to!  You can get a used copy off of Amazon.com for about 97 cents plus shipping.  Ann's book has some great soap recipes in it.  My favorite uses olive oil, tallow, and coconut oil.  Different oils have different properties, and once you get experienced at soap-making, it's fun to try out different oils in your batches!  Anywho, so you measure out your fats and oils, and then set the stockpot on the stove on low heat to begin melting the fats.

Next, it's time to measure the lye.  ALWAYS WEAR GLOVES, SAFETY GOGGLES, & A RESPIRATOR WHEN DEALING WITH LYE!  This is nasty, caustic stuff, and it's soooo much better to be safe than sorry!  I always measure the lye outside, where I can get good ventilation.  I use a plastic water pitcher for the lye and a plastic milk jug for the water.  I set the kitchen scale on a level surface outside, and then I set the plastic water pitcher (sans top) onto the scale.  I zero out the scale, then I VERY CAREFULLY measure/pour the lye flakes into the plastic pitcher.  Once that is done, I remove the pitcher from the scale, and set the plastic milk jug onto the scale.  Zero out the scale.  Carefully pour enough water into the jug.  Remove the plastic jug from the scale.  Next, carefully pour the water into the lye (in the plastic pitcher), stirring with a wooden spoon.  BE CAREFUL NOT TO SPLASH ANY LYE!  Make sure all lye dissolves into the water, then set the top onto the pitcher, and leave the lye in a safe and out-of-the-way place for 1-2 hours.  Meanwhile, in the kitchen, finish melting your fats on low heat, and then remove from the stove top to cool.  If you are lucky, your fats will cool at the same rate as the lye.  I am never this lucky, which is why I often use cold or warm water baths for the lye.

Make sure to stir your fat mixture every few minutes, so that it doesn't solidify on you in chunks while it cools.  When the fat mixture gets to be around 100 degrees, it's time to check on the temperature of your lye. 

A note on temperature reading: I always use two different digital thermometers (with metal bottoms) for the lye and the fat.  This eliminates any worry of contamination.

If the lye is much warmer than the fat, fill the sink with cold water, and set the plastic pitcher of lye in the water.  Gently stir with one hand while measuring the temperature with the digital thermometer with the other hand.  You need both the fat and the lye to be between 95 and 98 degrees at the same time in order to mix them.  NOTE: IT IS ALWAYS EASIER TO ADJUST THE TEMPERATURE OF THE LYE THAN IT IS THE FAT!  I speak from experience on that.

When the temperatures of the lye and the fats are within the 95 to 98 degree range at the same time, you are ready to mix them!  While gently stirring the fat mixture, carefully pour the lye into the fat mixture in a slow stream.  Stir constantly.  You should see an immediate color change, signifying that saponification is already taking place.  Pour all the lye into the fat mixture.  Now comes the really boring part.  You need to stir until you see tracings.  The time varies depending on the amount of fat(s) present in the soap batch, but is never less than 30 minutes of stirring or more than 1.5 hours.  I generally find that one hour of stirring will provide me with acceptable tracings.

Now, what the heck are tracings?  Well, as you stir and stir and stir, you will notice that your soap mixture is getting slightly thicker.  You will be able to see it coating the insides of the pot, and leaving a trail behind your wooden spoon as you stir.  Eventually (usually about an hour), you will notice that if you take your wooden spoon and dribble a bit of the soap mixture back into the pot, that the dribbles will sit on top of the mixture for a few seconds before disappearing.  Tracing is difficult to describe until you've actually made soap and seen it for yourself, but a good picture depicting it can be found HERE.

Once you spot tracings, it's time to add in your scents (if you want the soap to be scented).  Anywhere from 1/4 of an ounce to an ounce of essential oil works.  Mix the scents in thoroughly.  Then it is time to pour it into the mold.  We use 5 quart plastic ice cream tubs.  We nest these in between towels in a box, to prevent the soap from getting too cold as it finishes reacting.  Once the soap is poured, we put the lid on the box, and leave it in a warm place for 2 days.  


At the end of 2 days, we check the mold and voila!  Soap!


The soap needs to finish curing for 2 weeks before it can be used.  Until then it is still caustic (so try not to get it on your skin!).  The soap must come out of the mold before it's a week old, and be cut into bars.  As soap cures, it gets harder to cut (so you want to cut it into bars early).  Also, cutting it down into smaller sizes helps it cure a little faster.

At the end of 2 weeks, you have many bars of useable, homemade soap!  YAY!

**Please note that this blog entry was not meant to be a true tutorial.  Rather, it is intended to show the amount of time and energy that goes into a single batch of soap.


Extra! Extra! Read All About It!

Our lovely little inn was mentioned in last Sunday's Mail Tribune newspaper!  The article was by the lovely vino-writer, Janet Eastman, and mentioned things to do/drink/stay in our wonderful Applegate Valley.  We were one of only two B&B's mentioned, having the luxury of being able to provide guests with "vineyard view" stays!

HERE is the article 


Photo courtesy of Janet Eastman (taken in the Apothecary Suite)

Being a typical space cadet, I didn't even know that the article had come out until one of my neighbors walked over on Monday and showed me!  (Thank you!!)

Thursday, April 19, 2012

THINK PINK!

(And I'm not referring to Jugi...)

I won another meant-to-be-mine vintage faux birdie hat on Ebay last week! It was miscategorized (I love it when that happens) as a modern church hat! Teeheehee! So I won it for the low starting bid, and couldn't be more pleased...

As you can tell, I love-Love-LOVE my new hat! It would be the perfect hat to wear with a tailored 1940s suit!

Why My Husband Is AWESOME

He's so awesome, in fact, that I had to come up with a new word for his awesomeness...


Are you ready?...


He is AWESOMESAUCE!


Why?

Because he not only makes me seed drying trays and apothecary tables for my Harvest Room, but hat blocks for my millinery addiction as well!


AND

He makes fine furniture TOO!


Look at that GORGEOUS computer desk!


(It's Jugi-approved!)

Tuesday, April 17, 2012

New to the Etsy Shop!

I found this absolutely adorable vintage square dance dress while I was in town yesterday - SO cute, and very patriotic with the red, white, and blue decorations! Done in the 1950s style, but clearly made a bit later than that (though it does have a metal zipper). My best guess is that it dates from the 1960s or 1970s. Handmade, unlined, cute cotton fabric! PERFECT for that 4th of July BBQ! You can check it out at our Etsy store!


Sunday, April 15, 2012

Sea Nymph

Spent some time modeling my ship with my super-awesome photographer-husband! Tried to get into the spirit of things by wearing a shimmery blue taffeta 1950s dress and sapphire blue & white rhinestone parure necklace & earrings set. Channeling the sea nymph...

I even got Ryan to model the hat! (He's SUCH a good sport)

I love him so...

Friday, April 13, 2012

I'm Wearing a Boat on My Head!

I was recently asked about possibly making some fascinator-style hats (for non hat-wearers) for some women attending a "tea party" bridal shower next month. Fascinators aren't normally my arena of enthusiasm (the market already being flooded in that category by modern milliners), but I took a trip to the thrift store to see if I could find anything for inspiration. I came across this tiny toy balsa wood ship for $2.75, and that got me thinking...I came home, constructed a raised circular fascinator base using a scrap of buckram I had leftover from my Mad Hattress top hat, and this I covered with a scrap of leftover fabric from a Halloween costume made ages ago. The fabric is a wrinkled, shimmery iridescent blue-gold, which brings to mind water. I used electric-blue wired ribbon to simulate waves, and some gold ribbon just to bring the focus to the ship. Then, I glued shimmery pieces of rock, shells, pearls, and sewed on fish buttons and pirate treasure chest charms. There is even a dolphin riding the waves in front of the ship's bow. Of course, now that I am almost finished making this hat, I am totally in love with it! There is no way I can sell this one. *sigh* Perhaps this is why I am not cut out to be a professional milliner after all...I don't know if I can sell any of the hats I make!

Anywho, as I said, the hat isn't quite finished yet, but here is what all of the pieces look like laid out to their planned configuration.

Tuesday, April 10, 2012

Birdie Hat

I finished my little faux birdie tilt topper hat today. Nothing fancy - I was basically playing around with a piece of scrap felt that was leftover from making another hat. The bird is my first real attempt to recreate a vintage faux birdie, and I need to work on getting my feathers to flow a little better. The crown is open, and pushed in on the sides. I was patterning this hat after one of my beloved Frank Palma 1940s tilt hats (which also had an open crown with faux bird on top).

All in all, I like it, and I can't wait to wear it!

Monday, April 09, 2012

Poo-Tastic Easter Weekend

Well, you know those crazy farmers: they never take a break...or a Sabbath. This weekend was no exception! For an Easter bonnet, I wore a Carhartt beanie. My basket of eggs was actually a shovelful of donkey poo. Just in case some of you were beginning to think that I was too much of a girlie-girl! *wink*

This is what came off of ONE donkey pasture (and we cleaned out both of them this weekend!). Amazingly, we actually clean the pastures out every 6 months or so. The problem is that we have magical poo-producing donkeys. The good news is that we have VERY happy tomatoes every year!


Tuesday, April 03, 2012

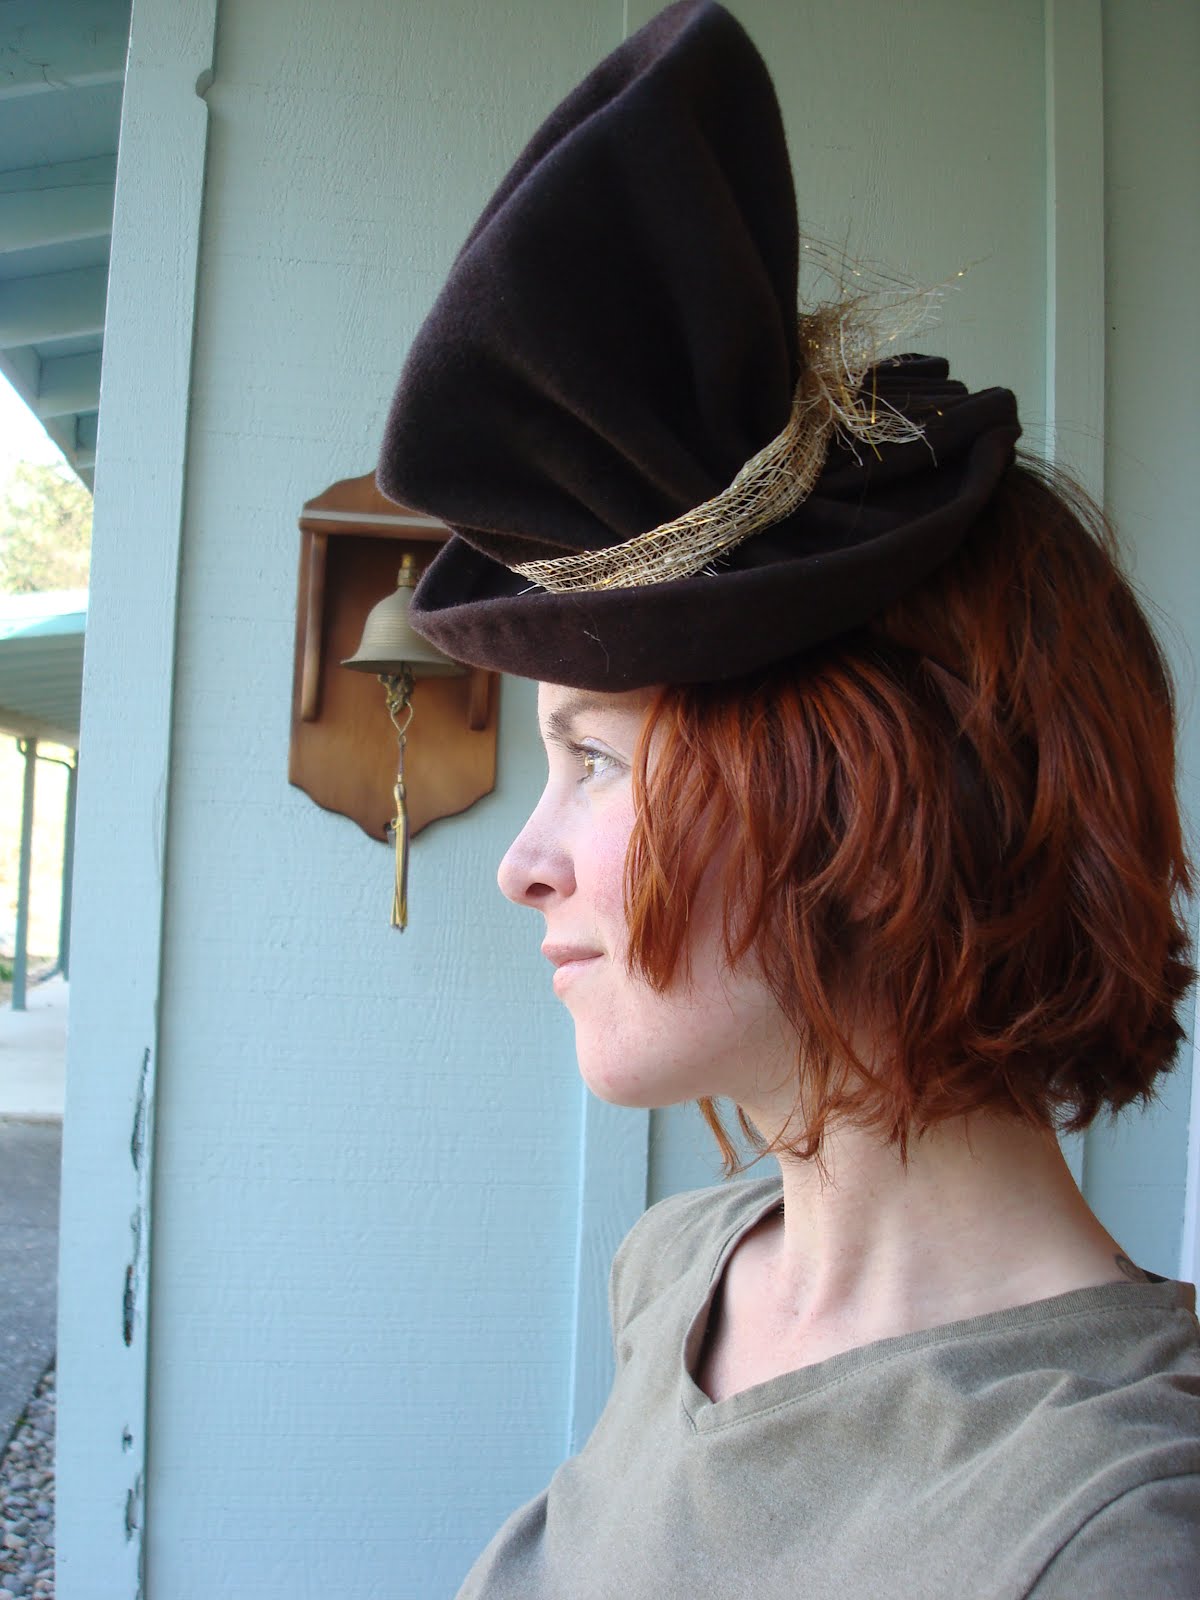
The "Rosalind": A 1940s Vintage-Inspired Felt Tilt Hat

Using a basic oval hat block (hand-carved by my wonderful husband!), the lovely Jeanna created this fabulous sculpted brown felt tilt hat! It is actually made of a single piece of felt with a gathered base (gathers are tucked into the back brim, creating some very cool accordion pleats). Because I wanted the focus to be on the fascinating structure of this hat, I trimmed it very simply with some sheer metallic gold ribbon, and made a messy little bow in back. If this were a true vintage tilt hat, it would be held on the head using a stiff piece of circular felt at the back of the hat. However, I chose to attach an elastic band.

FRONT VIEW


SIDE VIEW


BACK VIEW

We have named the hat after Rosalind Russell, a movie actress from the 1930s/1940s.

The "Rosalind" will be available for sale as a custom order on Etsy very soon!

Saturday, March 31, 2012

The Mad Hattress Takes on Medford

I just finished up with a 4-day "down & dirty" hat-making session with my favorite millinery guru, Jeanna. We worked each day from ~6:30 am - 7:30 pm, and created some awesome hats inspired by ones from vintage magazines from the 1930s & 1940s. I can't wait to post pictures of some of our creations on here soon! What a blast! Definitely made me realize that holding millinery workshops at my B&B is a really, really, really cool idea! Especially on the new deck that we are about to begin construction on...

This is the original vintage hat (by Sally Victor - photo is from a 1945 McCall's magazine) that I was trying to recreate:

This is my very first blocked felt hat!! Obviously, I did not have the original hat block for it, nor could I find or afford one. But, the thrift store just got in this lovely wooden salad bowl that worked PERFECTLY (best $2.50 I ever spent)! So, here is a teaser of the finished hat with the salad bowl block.

The Lady Amherst center tail pheasant feathers were curled at the base (just like the original vintage hat) via shaving/notching/steaming. I found a vintage ~1950s $2 steamer at the thrift store that works PERFECTLY in place of one of those fancy (and expensive!) steamers. The feathers are curled at their bases, which was difficult to do given the thickness of the quill and the fact that the Lady Amherst feathers tend to curl backwards on either side of the quill (making shaving them with a razor very tricky). The feathers are tacked onto the lip of the brim, and then the ends trail down onto the sides of the hat.

I also finished my "Mad Hattress" buckram hat (this one was made to match the dress I sewed a while back: http://apothecaryinn.blogspot.com/2012/02/rain-day-creativity.html). I had one leftover Lady Amherst feather, and the colors just seemed to match so well with the checkerboard pattern of the hat that I decided to combine the two! :)

This is the back view...

So, to show off my millinery prowess, I went into the heart of downtown Medford, in the center square, where there is an awesome statue of a man playing chess. I decided this man was in need of a worthy opponent...Here is the blocked felt "Sally Victor" hat with the trio of curled Lady Amherst pheasant feathers.

I shared my artistic space with the guy holding the "Freedom America" sign in the background. Between the two of us, we received quite a few car honks!!

Please note the hysterical expression on the pedestrian walking by...got quite a few priceless expressions. All in the name of "bringing the hat back!"

The Mad Hattress makes a formidable chess opponent!

*Please note that the Sally Victor hat, and many other vintage-inspired ones, will be for sale as custom orders on Etsy very soon!

Friday, March 16, 2012

History Repeats Itself...Sort of...

I found the most beautiful vintage wedding dress and matching hat on craigslist this week, and decided to purchase it. The entire ensemble was originally worn by a local woman for her own wedding in 1954. I guess the woman passed away last year at the age of 97, and before she died she mentioned the dress quite often and worried about what would happen to it when she passed away. Friends of her family listed it on craigslist. I didn't have the $60 asking price, but I explained that I loved and wore vintage clothing, and would give it a good home. So, $20 and a trip to Talent later, I was finally able to give a once-beloved dress and hat a new lease on life!

The beautiful sheath dress is composed of a silvery-blue brocade material with padded shoulders, 3/4 sleeves, metal side zipper, side pockets, matching belt, and a rhinestone pin. Fits like it was made for me, albeit made for me in that tight-like-a-glove sort of way...Kinda scary that I can still fit into a 24" waist if I hold my breath and don't eat anything (Ah, high school all over again!).